Showing posts with label TUTORIAL. Show all posts

06 August 2011

Waterproof Picnic Blanket

We had a crazy dry July over here. But I am hoping we get some rain this month. And I also hope we get some nice picnic days. In case any of those picnic days come shortly after a rainy day when the ground might still be wet, I present this waterproof picnic blanket. It can even be easily rolled up with straps for carrying.

When I had this idea I was sure there were some tutorials out there but instead of googling it I went it alone and came up with my own way of doing it. I think it turned out pretty great and was easy and cheap to make so I am putting my findings here in a tutorial. It actually turned out to be simple to the point of not needing a tutorial, no surprises or anything. But since I already took pictures along the way... here it is.

Supplies
*a thin blanket/bed cover (you could use something thinner, even a quilt top you make but the thin layer of batting gives the blanket a nice weight and makes it roll up very easily)
*a small tarp (I used a $6 6x6ft tarp that actually came with a rope too)
*4 pieces of thin rope at least 2 feet long each (or you could make the ties from fabric)

Step 1: Lay your tarp over your blanket right sides together and cut the blanket to the size and shape of the tarp.Step 2: Lay your ropes in their place. You want two groups of two ropes and you want them on one half of the blanket (because you will fold it in half before rolling up). So just space the two groups out approximately equally on one half of the side of the blanket. Leave a few inches hanging out with most of the rope length inside the sandwich of tarp and blanket. Use your biggest pins to secure the ropes in their places.Step 3: Pin the tarp and blanket together all around the edges. To avoid making extra holes in your plastic pin very close to the edge.Step 4: Sew the blanket and tarp together all the way around except leave a gap at least a foot long for turning. Be sure to go back and forth over the part where the ropes are attached a few times.Step 5: Clip any corners. And turn the whole thing right side out. Top stitch to close the opening you left for turning. There is the option to top stitch all around the blanket but I didn't.

Step 6: Take it out and enjoy a picnic. To carry: fold in half, roll up starting with non rope ends, tie ropes around roll, then I like to tie the extra length of the two groups of rope together to make myself a little shoulder strap.
linked up here:


14 January 2011

Making a Pattern For Pants From Pants

It's been fun making a few tutorials and contributing to the craft blog community a bit. I have learned so much from others' tutorials over the past year that I have gotten really into sewing and so I hope someone finds my tutorials useful.

This tutorial is for making a pattern for pants from existing pants. A super simple thing but one that I didn't really know how to do 6 months ago. And since I've learned I've done it a bunch of times. Here I'll show how to do it with a pair of my son's size 9 month pants but I also used the exact same technique to make my husband's PJ pants that I gave him for Christmas.

So step 1: find a pair of good fitting pants. I recommend finding a pair made of a material that is similar to the material you will be using. At least use woven for woven and knit for knit or take into account stretchiness if nothing else.

Step 2: lay the pants on a big piece of paper. For adult pants this may be tricky and unless you're really going to be using the pattern a bunch of time it may be easiest to just draw the shape directly onto the fabric you'll be using.


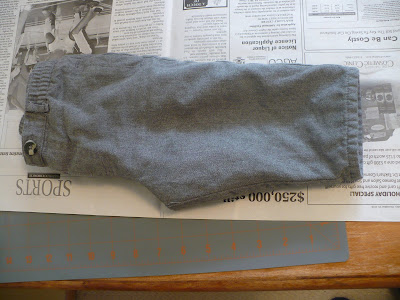
Step 3: Now put one leg inside the other. This is the important part that once I 'got' this I 'got' everything about making this pants pattern. Put one leg inside the other and then the whole construction of the pants should start to look a bit obvious or maybe not yet but it will soon.

Step 4: Arrange the pants with one leg inside other so that it looks like this, this is the front side. Put it to one side of your big paper and trace the shape. (Trace 3/8" outside the shape to include a seam allowance, my paper wasn't quite big enough so I didn't.)


Step 5: Flip the pants over along the line that is the outside leg so that now you can trace the back side of the leg.


This curve that I'm pointing to is what you want to trace so you have to move that front part out of the way.
Just tuck it out of the way so you have something that looks like this and you're ready to trace.


Step 6: Trace that back side of the pants and you'll have something that looks like this. You can see I've drawn lines where the actual pants end at top and bottom (useful when you are making pants from other clothes and are 'reusing' a hem) and drawn another line approximately 1 1/2 " further out that represents where you should cut your fabric so that you have enough to do either a hem or an elastic waistband.


Step 7: Cut out your pattern and you're done. Be sure to mark any important info about the pants onto your pattern. For instance you can see here I've written which side was the front and back and that there is no seam allowance included. Also be sure to write what size these pants fit.


Step 8: Make the pants. I did make pants from this pattern and will put up a tutorial for that soon. Here is a preview of Henry in the pants I made from this pattern.

the tutorial is here.


I linked this at:


07 January 2011

Circle Table Cloth to Circle Skirt

I've been looking for a winter skirt for a while now. Ever since my other one got completely covered in burs and I don't have the patience to pick them all out. But I couldn't find one that was casual and flowy. But I did find this table cloth, a circular table cloth. So I thought I'd see how easy it was to make a circle skirt from a circle table cloth. It might not come up that often in life that you are in possession of a circular table cloth and are in need of a circular skirt but I thought I'd show the step anyway, just in case.

For maximium ease and maximum recycling I used the elastic waistband off these old yoga pants. (These had a proper elastic in a casing, the fold over type might not work as well, especially with heavy skirt material like this.) So here are my supplies, one circular table cloth and one pair of old yoga pants:


Now measure your waist, wherever you want it to sit and add 2 inches. Now divide that number by 2 pi or 6.28. And now you have the radius you want. (Since circumference = 2 pi r.) (My waist was 31 inches so added to to use 33 inches and divided by 6.28 to get a radius of 5.25 inches.)

Now fold the table cloth into 4 like so:

And use a ruler to draw several points at a distance of your radius number (5.25 inches in my case) from the point.


The dots will make an arc, now cut out that arc.

You can quickly try it on now to make sure you did it right, it should slip on very easily at this point. Now cut off the waist band of your pants, trim off a little extra to make sure you leave the casing intact.


Next step: pin the skirt to the elastic. Do this on the right side of the table cloth material. The skirt material should be bunching up, do your best to make it bunched up evenly. I found this easy to do if I put the first 2 pins in at the farthest points of the waistband and tablecloth and then kept dividing the distances in half for both materials, if that makes any sense.

Now sew. Use a wide 3 step zig zag stitch to keep the waist stretchy. Try to pull the elastic taut against the fabric as you go. This will ensure even bunching.


It should look like this:

And will look like this if you flip the elastic up. You could definitely just leave it like this and be done. I didn't because they totally mismatch and because my table cloth material is quite prone to fraying.

Now flip the elastice over to the inside of the skirt.
And sew around the waistband again to encase all your raw edges. Use a 3 step zig zag stitch again. It's not so important to pull the elastic tight this time.


And you're done. I also added a pocket made out of the circle I cut out. I think I will make a pact right now to always add pockets to things that I sew for myself. Why not? Here I am modelling my skirt.

If you're into a slimming look definitely don't choose a thick fabric like mine. But for me, I like it. And it is super warm, especially because I like to wear it with my wool longjohns. Here I am wearing it out in the snow.


03 January 2011

A Case for my Knitting Needles: A Tutorial

I made myself a roll up case for my knitting needles. I can see which sizes I have and find them easily. And I got to use some fun fabrics that are a bit loud for anything else I might usually want to sew. And I even put spaces for removable/interchangeable labels to mark the sizes. There are already a few tutorials for knitting needle cases out there on the internet but I thought I'd add mine. And I think the label bit might be a new idea and is definitely a good idea, if I may say so myself.


I chose to make 16 pockets and each pocket 1 and 1/2 inches wide which worked out well.

First gather the materials, fabric that's a bit stiff like home decorating fabric:
outer fabric: 16" x 26"
inner main fabric: 16" x 26"
pocket fabric: 13" x 26"
clear plastic (you know that thick stuff from packaging for duvet, changing pad etc): 1 1/2" x 26"
ribbon for tie: 2 pieces about 15" each
elastic: 26"


Iron the pocket material in half. I also used the iron on a low setting to get rid of wrinkles in the clear plastic. I carefully passed the plastic under some fabric with the iron on top.


Now take the strip of plastic and sew it onto the pocket material about an inch down from the folded top. Just sew one line along the bottom. To keep the plastic in place without putting holes in it use some tape.


Place the pocket material on top of the inside fabric and pin in place. Line up the elastic where you want it, about 3 inches down from the top of the inside fabric. Pin the elastic in place.

Next step is to sew up segments to make the individual pockets. Take a ruler and draw lines using chalk or disappearing ink all along the length of the case 1 and 1/2 inches apart. Be sure to leave at least a half inch space on each side of the case. Draw lines on the pocket material and on the elastic. And then sew it up, pockets and elastic. Be sure to go back and forth on the elastic several times since it is such a short bit to sew.


Now it looks like this:


Now flip it over and on top of the outside fabric RIGHT SIDES TOGETHER. Put the ribbons on the side (same side). Pin and sew around leaving about a 6 inch opening for turning. /you want to have some space after the pocket on each side (for turning and top stitching).


Clip corners:

And turn right side out so you have this:

And then top stitch so you have this: the completed knitting needle case.


Load it up with your knitting needles and cut paper labels (a thick paper works best for slipping into the pockets).