This tutorial is for making a pattern for pants from existing pants. A super simple thing but one that I didn't really know how to do 6 months ago. And since I've learned I've done it a bunch of times. Here I'll show how to do it with a pair of my son's size 9 month pants but I also used the exact same technique to make my husband's PJ pants that I gave him for Christmas.
So step 1: find a pair of good fitting pants. I recommend finding a pair made of a material that is similar to the material you will be using. At least use woven for woven and knit for knit or take into account stretchiness if nothing else.
Step 2: lay the pants on a big piece of paper. For adult pants this may be tricky and unless you're really going to be using the pattern a bunch of time it may be easiest to just draw the shape directly onto the fabric you'll be using.

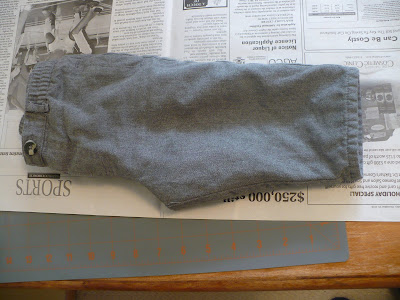
Step 3: Now put one leg inside the other. This is the important part that once I 'got' this I 'got' everything about making this pants pattern. Put one leg inside the other and then the whole construction of the pants should start to look a bit obvious or maybe not yet but it will soon.
 Step 4: Arrange the pants with one leg inside other so that it looks like this, this is the front side. Put it to one side of your big paper and trace the shape. (Trace 3/8" outside the shape to include a seam allowance, my paper wasn't quite big enough so I didn't.)
Step 5: Flip the pants over along the line that is the outside leg so that now you can trace the back side of the leg.

This curve that I'm pointing to is what you want to trace so you have to move that front part out of the way.

Just tuck it out of the way so you have something that looks like this and you're ready to trace.

Step 6: Trace that back side of the pants and you'll have something that looks like this. You can see I've drawn lines where the actual pants end at top and bottom (useful when you are making pants from other clothes and are 'reusing' a hem) and drawn another line approximately 1 1/2 " further out that represents where you should cut your fabric so that you have enough to do either a hem or an elastic waistband.

Step 7: Cut out your pattern and you're done. Be sure to mark any important info about the pants onto your pattern. For instance you can see here I've written which side was the front and back and that there is no seam allowance included. Also be sure to write what size these pants fit.

Step 8: Make the pants. I did make pants from this pattern and will put up a tutorial for that soon. Here is a preview of Henry in the pants I made from this pattern.
the tutorial is here.

I linked this at:


Thank you, I used your instructions to make trousers for my 2 boys, they turned out great for someone who's not that great at sewing.
ReplyDeleteHello and thanks for your tutorial. I am a bit confused with step 6: "and drawn another line approximately 1 1/2 " further out that represents where you should cut your fabric so that you have enough to do either a hem or an elastic waistband."
ReplyDeleteCan you give me a little more detail as to how to do this step. I am assuming you added some inches to allow for a waistband that will be gathered with elastic. If this is correct, can you tell me exactly how to do it. It's a little hard to tell from the photo due to the print on the paper.
Thanks so much
I have seen many pattern from current pants tutorials but this was the only one to put it in a way that was easy to understand and copy. Thanks! I have the pattern drawn out, allowances added, and about to cut out. I can't wait to see the finished product.
ReplyDelete