10 January 2011

More Shoes for Henry


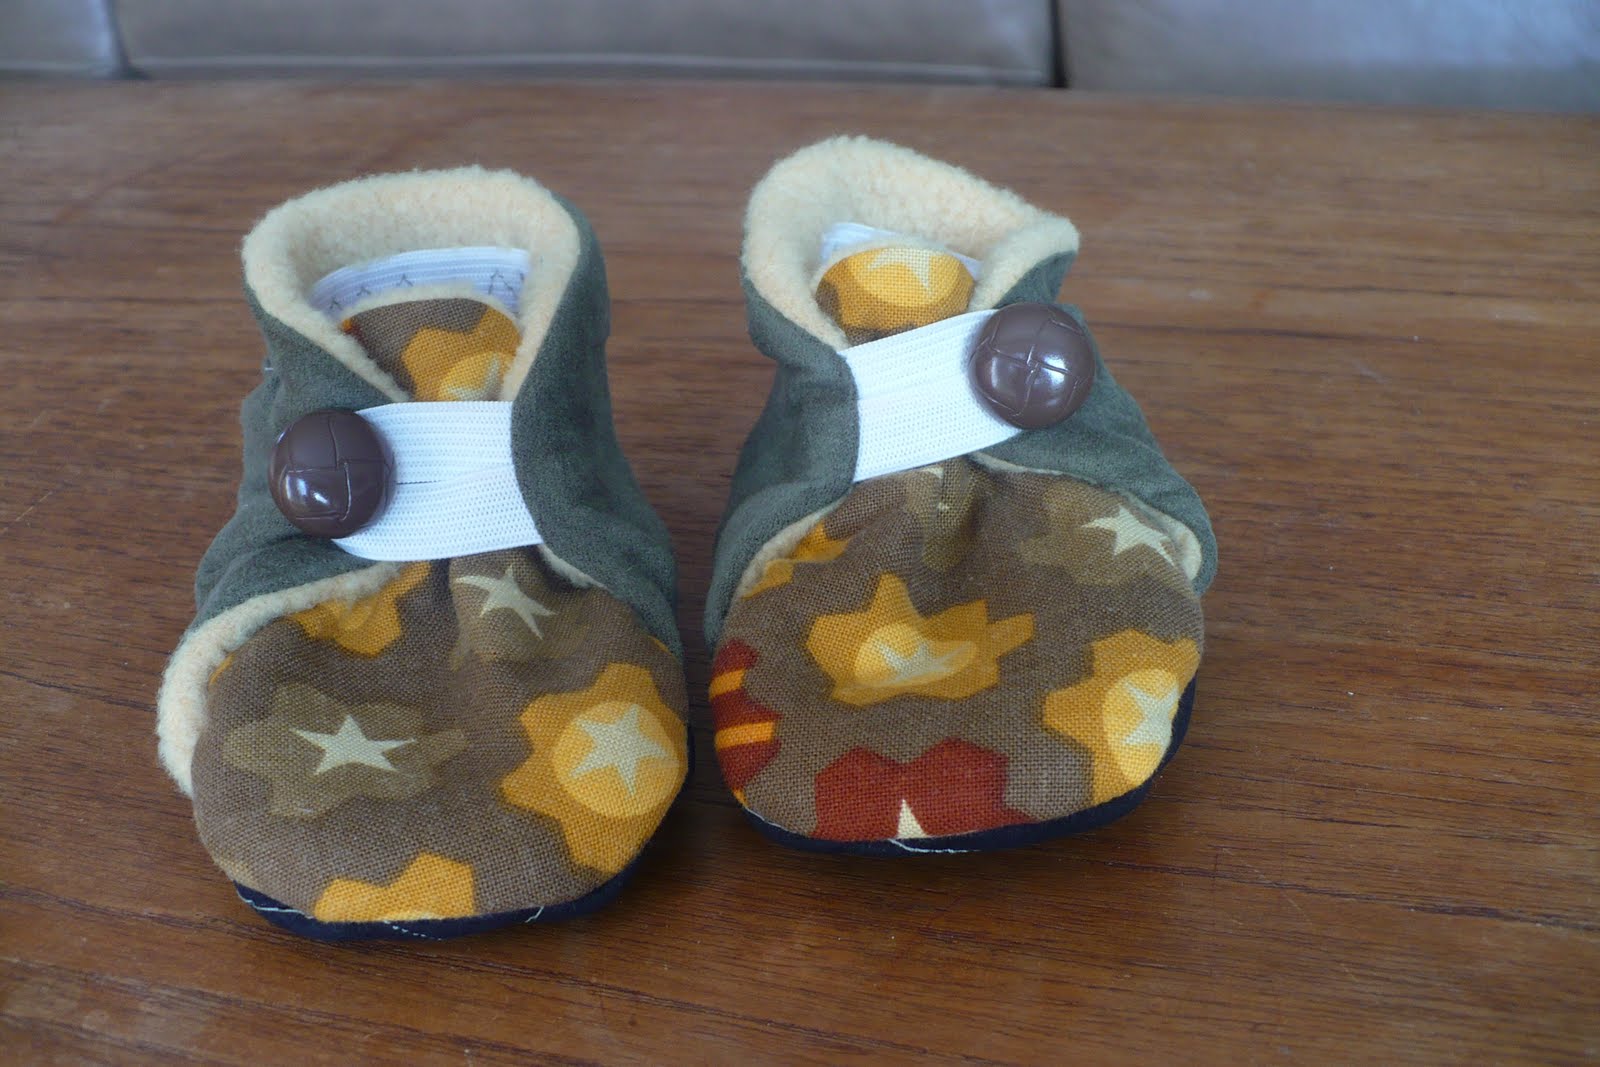
Even though I always end up putting Henry in the same old Robeez shoes, I can't help myself from making him more. And I still didn't have a warm pair that fit well. So I made these.

They are from my new book Handmade Beginnings by Anna Maria Horner. I really like this book and am dying to make the little jacket from it for Henry to wear this spring, just got to make some fabric choices.


I like how they turned out. I love the fabric choices I made and they fit really well. Lined with fleece and coming up over the ankle they should keep his feet just a little warmer than his usual shoes.

Here are some pictures showing the fun he got up to today in his new shoes:
Playing behind the sofa, getting covered in dust


Falling asleep in his high chair while I was cooking, so sweet!

A Chance to Sew a Dress


We went to a joint birthday party for all the babies from our prenatal class who are turning one right about now. We did a little gift exchange and since of the 6 babies, Henry is the only boy I took the opportunity to sew a little toddler dress. I used a woman's size large thin sweater to make a little T-shirt dress with a belt and matching bloomers. I started off making a tutorial but it ended up being one of those do this, now try it on, now change it a little bit kind of projects. One thing that made it super easy was that I was able to ``reuse`` the entire neckline and shoulders by putting some fabric behind the V-neck to make it smaller.


I had Henry model it but it was near impossible to get a photo of him - he would not stop moving on this day. I love how it turned out, a little big on Henry but he is the skinniest I think. It went to a little girl who is also small so it'll be great to wear this summer hopefully.


A closeup of the bloomers:


I really love the bloomers, think I will make some more for Henry to wear as shorts this summer.

07 January 2011

Circle Table Cloth to Circle Skirt

I've been looking for a winter skirt for a while now. Ever since my other one got completely covered in burs and I don't have the patience to pick them all out. But I couldn't find one that was casual and flowy. But I did find this table cloth, a circular table cloth. So I thought I'd see how easy it was to make a circle skirt from a circle table cloth. It might not come up that often in life that you are in possession of a circular table cloth and are in need of a circular skirt but I thought I'd show the step anyway, just in case.

For maximium ease and maximum recycling I used the elastic waistband off these old yoga pants. (These had a proper elastic in a casing, the fold over type might not work as well, especially with heavy skirt material like this.) So here are my supplies, one circular table cloth and one pair of old yoga pants:


Now measure your waist, wherever you want it to sit and add 2 inches. Now divide that number by 2 pi or 6.28. And now you have the radius you want. (Since circumference = 2 pi r.) (My waist was 31 inches so added to to use 33 inches and divided by 6.28 to get a radius of 5.25 inches.)

Now fold the table cloth into 4 like so:

And use a ruler to draw several points at a distance of your radius number (5.25 inches in my case) from the point.


The dots will make an arc, now cut out that arc.

You can quickly try it on now to make sure you did it right, it should slip on very easily at this point. Now cut off the waist band of your pants, trim off a little extra to make sure you leave the casing intact.


Next step: pin the skirt to the elastic. Do this on the right side of the table cloth material. The skirt material should be bunching up, do your best to make it bunched up evenly. I found this easy to do if I put the first 2 pins in at the farthest points of the waistband and tablecloth and then kept dividing the distances in half for both materials, if that makes any sense.

Now sew. Use a wide 3 step zig zag stitch to keep the waist stretchy. Try to pull the elastic taut against the fabric as you go. This will ensure even bunching.


It should look like this:

And will look like this if you flip the elastic up. You could definitely just leave it like this and be done. I didn't because they totally mismatch and because my table cloth material is quite prone to fraying.

Now flip the elastice over to the inside of the skirt.
And sew around the waistband again to encase all your raw edges. Use a 3 step zig zag stitch again. It's not so important to pull the elastic tight this time.


And you're done. I also added a pocket made out of the circle I cut out. I think I will make a pact right now to always add pockets to things that I sew for myself. Why not? Here I am modelling my skirt.

If you're into a slimming look definitely don't choose a thick fabric like mine. But for me, I like it. And it is super warm, especially because I like to wear it with my wool longjohns. Here I am wearing it out in the snow.



06 January 2011

Trivet


Today I finally finished the giant trivet that I started working on back before the holidays. We have a beautiful teak dining table so we are always careful not to put hot (or even warm!) things directly on it. So it's usually a mess of mismatch trivets. So I wanted to make one trivet big enough to hold all (or almost all) the hot pots for one meal. So I made this:


You can tell I'm quite pleased with how it turned out because I've included 4 pictures of one simple trivet. I got the idea from Ken Burton's Table Saw Book but made it larger to fulfill my vision. I chose 9" x 24". And like always I just used some scrap 2 x 4 s and my table saw. Then stained and varnished it so I think it looks like a quite nice trivet rather than a hunk of structural lumber on the dining table.

And here it is in action, we had fajitas for dinner tonight and it held all 3 of our hot dishes. Perfect!

05 January 2011

Homemade Christmas Gifts Part 2

These are the gifts I made for Kevin and Henry this year.


This is my masterpiece that I started making for Kevin in October. It was a lot of work and used all my skills: sewing, embroidery, painting, woodworking. I was inspired by a painting we saw in an expensive baby shop that Kevin loved. The painting cost $300 and I thought I can recreate that. But since I'm not really a painter I thought I'd do it with fabric. All I painted was the Earth just using regular acrylic paint. It was really fun to figure out how to put it together as I went along. Briefly, here is how I made it. Maybe Kevin will even read it and gain a new appreciation for my work of art.

1.Got a piece of canvas (quite loosely woven to allow for easy embroidery), sprayed it black with fabric spray paint.
2.Using gold thread in my sewing machine, sewed on the lines representing the orbits.
3.Found various circular objects in my home the right size for each planet and the sun and traced them. Cut two circles for each planet, sewed them together, turned and top stitched them onto the fabric. (That is how I do applique, prefer it to other methods and feel it's much sturdier.)
I did add some embellishment to some of the planets like that big swirl on Jupiter and some sewn lines on Venus.
4.Sewed on small buttons to represent the dwarf planets.
5.Did A LOT of embroidery for the labels.
6.Using wood from 2x4s, made a wooden frame.
7.Stapled the fabric onto the frame.

And the other presents I made for them were matching slippers and PJ pants. For Kevin's slippers I used this pattern that I bought years ago, he needed new ones because the ones I made him originally were finally worn out. And this time I used some scrap yoga mat material that Len's Mill Store was selling for the sole so they are extra comfy. For the bottom of the sole I use fake suede upholstery fabric and that held up very well. On Henry's I added some vinyl to the sole to make them non-slip. For Henry's slipper pattern I just copied his Robeez. In these photos he is wearing just one slipper, we seem to have left the other one at Nana's.


And for the pants I just traced some of their existing pants, Indietutes has great instructions for that here. I put seam pockets in for Kevin because I know he hates pants without pockets. And the material is just a flannel sheet that the thrift store had for 50 cents and it has dogs and cats snuggling each other so I had to use it for something.

03 January 2011

Back Home


The holiday season is over and we are back home after 2 weeks away. We are completely unpacked and trying to get back to normal. Grocery shopping is done, the washing machine is going and Henry is happily playing with some of his new toys from Christmas.

A Case for my Knitting Needles: A Tutorial

I made myself a roll up case for my knitting needles. I can see which sizes I have and find them easily. And I got to use some fun fabrics that are a bit loud for anything else I might usually want to sew. And I even put spaces for removable/interchangeable labels to mark the sizes. There are already a few tutorials for knitting needle cases out there on the internet but I thought I'd add mine. And I think the label bit might be a new idea and is definitely a good idea, if I may say so myself.


I chose to make 16 pockets and each pocket 1 and 1/2 inches wide which worked out well.

First gather the materials, fabric that's a bit stiff like home decorating fabric:
outer fabric: 16" x 26"
inner main fabric: 16" x 26"
pocket fabric: 13" x 26"
clear plastic (you know that thick stuff from packaging for duvet, changing pad etc): 1 1/2" x 26"
ribbon for tie: 2 pieces about 15" each
elastic: 26"


Iron the pocket material in half. I also used the iron on a low setting to get rid of wrinkles in the clear plastic. I carefully passed the plastic under some fabric with the iron on top.


Now take the strip of plastic and sew it onto the pocket material about an inch down from the folded top. Just sew one line along the bottom. To keep the plastic in place without putting holes in it use some tape.


Place the pocket material on top of the inside fabric and pin in place. Line up the elastic where you want it, about 3 inches down from the top of the inside fabric. Pin the elastic in place.

Next step is to sew up segments to make the individual pockets. Take a ruler and draw lines using chalk or disappearing ink all along the length of the case 1 and 1/2 inches apart. Be sure to leave at least a half inch space on each side of the case. Draw lines on the pocket material and on the elastic. And then sew it up, pockets and elastic. Be sure to go back and forth on the elastic several times since it is such a short bit to sew.


Now it looks like this:


Now flip it over and on top of the outside fabric RIGHT SIDES TOGETHER. Put the ribbons on the side (same side). Pin and sew around leaving about a 6 inch opening for turning. /you want to have some space after the pocket on each side (for turning and top stitching).


Clip corners:

And turn right side out so you have this:

And then top stitch so you have this: the completed knitting needle case.


Load it up with your knitting needles and cut paper labels (a thick paper works best for slipping into the pockets).